Architectural visualization is as much art as it is science. And the best projects are often those that stretch us across both dimensions. Our latest post uncovers the secrets behind a recent creation from TILTPIXEL artist, Adam Blair.
Adam joined TILTPIXEL nearly a year and a half ago, having worked for several media companies in San Antonio and Houston. As an expert in modeling and texturing, we knew Adam’s skill set was the right match for our client. Weeks later, with the project complete, Adam was pleased to walk us through his approach to an unusual challenge.

 Step 1
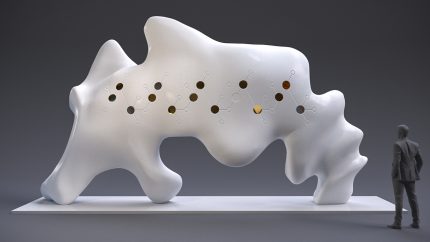
This project started with a client needing to previsualize a large sculpture to be installed in the lobby of an oil company’s building in Shanghai. The idea was to model the sculpture in 3D and send the finished model to Shanghai to be fabricated. The inspirational images the clients referred me to incorporated both geometric and organic forms. They wanted the model to be 12’ft tall and 15’ft wide. They also wanted the sculpture to be smooth, with gold geometric cutouts going through the sculpture. This sculpture was to represent the engineering that goes behind the scenes, which is why we based the shapes and cutouts off the molecular structure of petroleum. After getting a rough view of what they wanted, during the initial meeting we jumped into Autodesk’s Mudbox and started concepting.
Step 2
Once the basic shape was determined in 3D, the concepted model needed to be rebuilt to have a smooth polygonal flow. This would ensure that when I began sculpting at a higher polygonal count, the underlying skeleton of the mesh would better support both the large and intricate details to be built on top.
Step 3
![]() With the base sculpture ready to be detailed, I began adding the large details first. I made sure the sculpture had at least three contact points to the ground that would support the weight of the overall structure. It was important that I keep the scale in mind, so I made the sculpture in 3D a 1 to 1 scale of the finished model. I sculpted the large details like tapering and curves first. I constantly rotated the sculpture to see what it would look like from all angles. Since the viewers would be able to walk around the object, it was important that this sculpture be dynamic from all angles. I constantly looked at the 3d model from the point of view of the people viewing this object.
With the base sculpture ready to be detailed, I began adding the large details first. I made sure the sculpture had at least three contact points to the ground that would support the weight of the overall structure. It was important that I keep the scale in mind, so I made the sculpture in 3D a 1 to 1 scale of the finished model. I sculpted the large details like tapering and curves first. I constantly rotated the sculpture to see what it would look like from all angles. Since the viewers would be able to walk around the object, it was important that this sculpture be dynamic from all angles. I constantly looked at the 3d model from the point of view of the people viewing this object.
Step 4
![]() Once I was happy with the flow of the sculpture from all angles, I began adding the shapes to be cut out of the sculpture. These shapes represent the molecular structure of oil. I painted all the shapes in Mudbox onto the model to use as a guide for where to place the cut-out shapes.
Once I was happy with the flow of the sculpture from all angles, I began adding the shapes to be cut out of the sculpture. These shapes represent the molecular structure of oil. I painted all the shapes in Mudbox onto the model to use as a guide for where to place the cut-out shapes.
Step 5
![]() I used a tool in 3Ds Max called the Pro-Boolean tool, which would remove the shapes I wanted to be removed. Once the geometric shapes had been removed, I brought the model back into Mudbox to paint in the small lines connecting the shapes. These lines would be carved into the model, so instead of physically sculpting the lines in 3D, I used the painted lines in the bump map channel to give that impression. Once that was done, I created the materials and lights to show off my amazing sculpture. Easy.
I used a tool in 3Ds Max called the Pro-Boolean tool, which would remove the shapes I wanted to be removed. Once the geometric shapes had been removed, I brought the model back into Mudbox to paint in the small lines connecting the shapes. These lines would be carved into the model, so instead of physically sculpting the lines in 3D, I used the painted lines in the bump map channel to give that impression. Once that was done, I created the materials and lights to show off my amazing sculpture. Easy.
Easy?!
In our office, Adam is the guy who never backs down from a technical challenge. He seeks opportunities to research and experiment, but his appreciation for artistry remains at the forefront. Thanks, Adam, for describing this recent venture. The client was thrilled…and perhaps we’ll see it in Shanghai one day.